

Technical - Links - Videos - FAQ
How To's
One of the ways to
give back, and say thanks to those that have helped me, is to share material
I have created over the years. I have been involved locally with a group of
Christmas Decorators and we meet once a year. We call our meeting
C.L.A.P.
CLAP stands for Christmas Light
Addiction Program, for those with the
Christmas Light Addiction Problem. This is a term I came up with years ago
for a signature on many forum pages, and this term has now taken off and is
used world wide to describe those of us who are afflicted by all this. I
certainly wish I would have copy righted the term! This meeting is meant to
promote Holiday decorating and continuing education for the latest and
greatest methods at a local level. I am also involved in a national effort
called Christmas Expo. I
participate, assist with education and teach as well. Below is the majority
of my historic material presented over the years. It is here to use for learning purposes. To
that extent, download it and use it. If you would like to repurpose
it, please ask first.
Chauvet 200B DMX Fixture Enclosure
Enhanced Wooden Cut-Outs
- Updated 7/2023
Portable Hole Lite (Monkhouse Design)
2011 Christmas
Expo - DMX Basics
- (10mb)
2011 Christmas Expo -
DMX Practical - (9mb)
2011 Christmas Expo -
Curtain Strobes - (7mb)
2010 Chicagoland Mini
- DMX
Basics/LOR
2011 PacNW Regional CLAP - DMX
Flood Presentation
2012
PacNW Regional
CLAP - RGB
Realization
2013 PacNW Regional
CLAP - Powering RGB
Elements
2015 Christmas Expo - Dealing With Media & Charities
2016 - Christmas Expo - Precision EMT
Bending Workshop
Precision EMT Bending
Tutorial -
Updated - 7/16
2019 Christmas Expo - All
Things Wireframe
2020 Michigan Lighting Group - "That
House" Updated 4/2020
2021 Christmas Expo -
Illumination of Lights
2021 Christmas Expo - Oh
Christmas Tree
2021 Christmas Expo - "Fort Knox" Security for your Display
2023 Christmas
Expo - The Art and Presentation of a Christmas Display; The Holy Grail
(Please request via email. Click here)
2023 Christmas Expo - Mega Tree Build;
Imagination to Reality!
2023 Christmas Expo - I Love it When
a Plan Comes Together
Display Planning and Execution Documents
Spiral Tree Calculator
Spreadsheet
Display 50 Controller
Spreadsheet
"Behind the Curtain @ Woodinville Wonderland"
An in-depth look at how we do some things. If you want to see something posted, send us an email and let us know.
Display Logistics - Before any computer or "programming" work can be done, we have to update our Master Excel Spreadsheet. I could not do a display without this document. It is my bible. All the new additions need to be added here first. The version you see here is new and updated for 2012. Rick Williams of Quartz Hill Christmas came up with this spreadsheet years ago, and it was originally a 25 controller document. I had extended and exhausted the 25 version so badly, that I had to send mine to Rick a couple of times to fix up. I am not a Excel expert by any stretch. Rick had been contemplating a 50 controller version for a few years. After he saw my abomination, he pushed out the new 50 controller version back in 2010. I finally bit the bullet and completely re-created the old spreadsheet, into the new format. I then modify the spreadsheet with my own touches. These allow me to traverse the workbooks quickly, and I add the wire lengths and totals. This mainly helps me from year to year when putting a vignette/controller together in the yard for the extension cord purposes. I have all my cords stored by lengths. I print out this document, and it is my guide to hook up all the extension cords to the controllers. Should you desire a copy of this spreadsheet, send me an email, I have the blank original, as it looks like Rick has taken down his page.
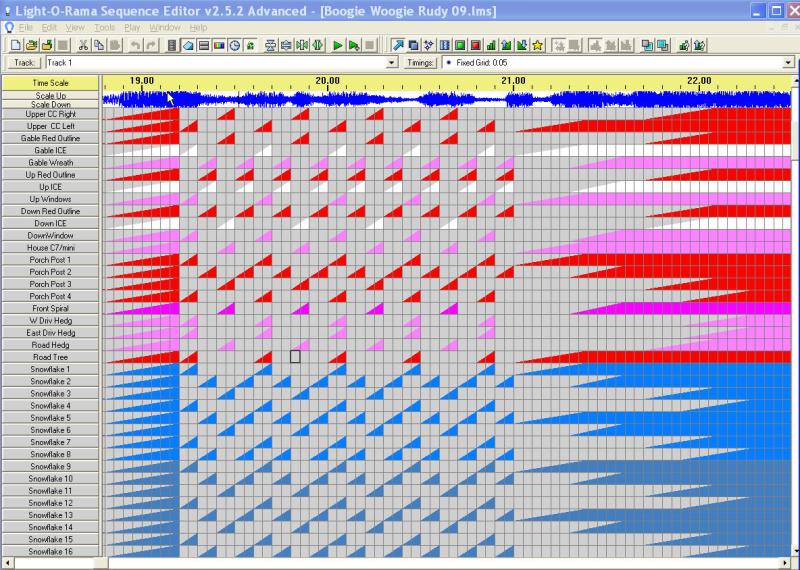
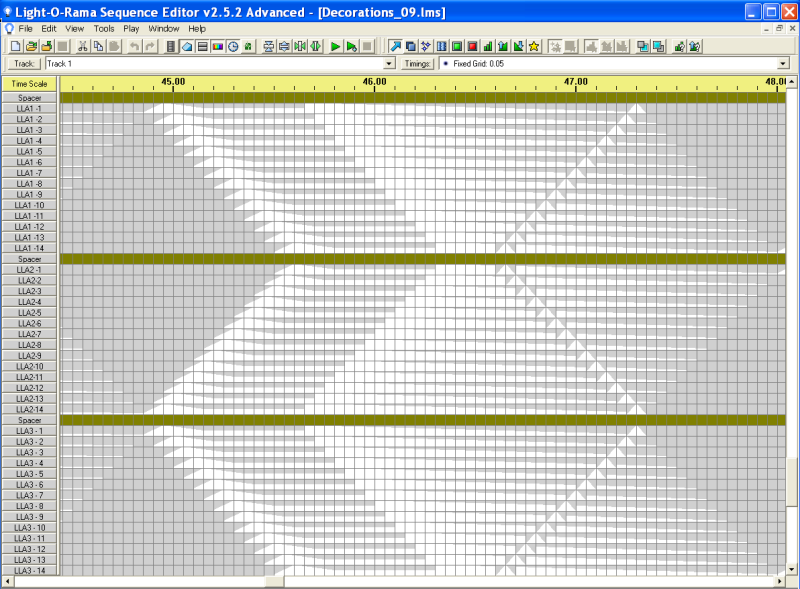
Animating the Lights to the Music - We started blinking lights with a product called Light O Rama (LOR). LOR has 2 aspects, software and hardware. Software wise, there is a "Suite" of tools that we leverage, but the one of most interest is the Sequence Editor (SE) see picture below. This is very much like Microsoft Excel. The SE allows me to import a song in either MP3 or WAV format. I can then view the audio wave form and leverage several wizards to find the beat of the song. I also have to identify, and embed all the lights that need to blink or flash. We call these "channels" These all have names. To date, we have over 530 channels of AC animation, one DMX Universe (theatrical lighting standard) of 512 channels that I could do something with. While we use a LOT of LOR AC Controllers, we also leverage a lot of "DIY" controllers as well. These plug into our LOR network and are just a different, in the that they are DMX based. LOR controls all this very nicely. Looking at the SE interface in the picture below, you see the song time across the top, and channels down the left side. You are only looking at about 4 seconds of the song and only 35 channels. Notice the scroll bars. Each channel is color coded. If appropriate, they do match the color of the light string, such as Red - Green - Blue - White. Multi color strings are shown in pink. Currently, it takes me about 15-20 hours per MINUTE of music on a new song/sequence. There are wizards that help identify the beat of the song, but a lot of time goes into listening for, and being able to capture details in the song, like guitar and piano riffs etc.... This is why it takes so long. Updates to each song for the new years additions usually goes pretty quickly.
I live on a 1 acre, corner lot. To give me a feel for my display layout, I create a "Light Bright" image of my house and yard. There are ways to make this look better, by embedding pictures, but with my yard layout, that is not super practical. So I stay simple. While it may be confusing to you, it does mean a lot to me. If you look at it for a while, it will give you a perspective of the of the display set up and vignettes. I have multiple viewing angles, and a very wide perspective from each angle, the 3 main perspectives being the street entrance, the front view of the house, and the 236th Ave (west side yard) perspective.
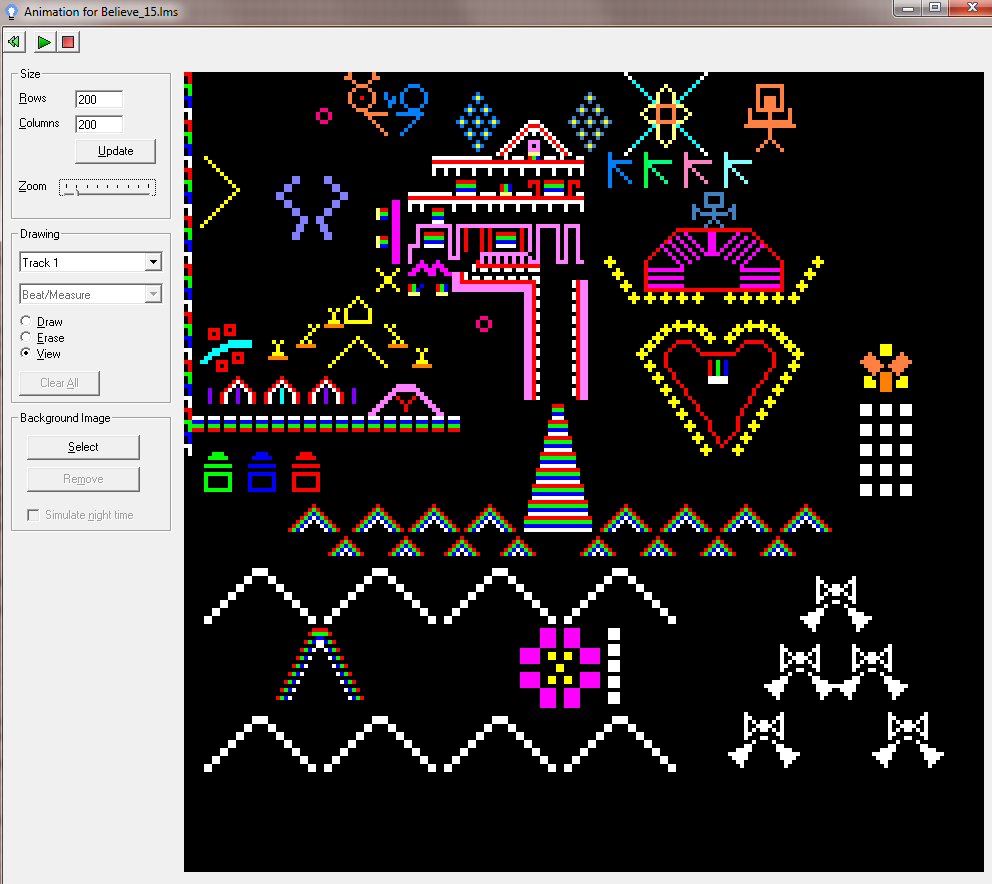
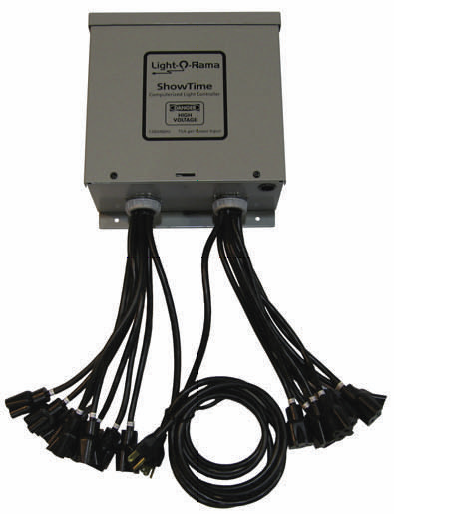
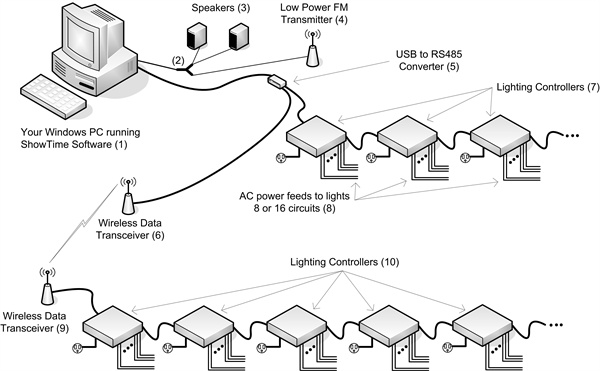
When I play the song, and watch this Animation Window, I can see the different light strings turn on and off according to the SE window. Watching this, I can get the song to about 95%. I then have to go outside when the display is up to see the song in motion, then make edits. I do this on the night before I "Light Up" for the season. This of course is after a thorough check of all channels has happened to ensure I plugged everything in right! Next we have to talk about the Hardware interface of LOR. If you look at the picture below, the "Controller" as we call it is a printed circuit board that has some solid state triacs that control the lights. A Controller will have 17-18 cords plus a communications CAT5E network cable coming out the bottom. 16 of the cords are plugs that the lights go into. 1-2 cords are power plugs. So each Controller will have 16 Channels assigned to it, hence 16 plugs. I have dozens of these Controllers in the yard, or on the roof. In addition to the commercial LOR product, there is a mixture of Do It Yourself controllers and equipment I use in the display. DIY means that an individual designed equipment that gets offered to the community in something called co-ops. The hardware needs to be completely assembled by me. This does give us the lowest cost per channel, and some unique features like Wireless DMX at a great price. As E1.31 (DMX over ethernet) has crept into my technology map, the overall scheme of the display has changed over the years, but the thought and planning to add that technology is pretty much the same. Lastly, the computer that controls this, has a USB cable that plugs into an RS485 communications device. The RS485 either then plugs directly into the 1st Controller in the network, or in my case to a wireless device that talks to several other wireless devices in the yard attached to clusters of Controllers. Anything E1.31 has its own network, and controller. The diagram below only pictures the LOR network in my display.
The LOR software allows me to create a "Show", which is just a Playlist,
much like what you create for your MP3 players. I
then schedule what time the show starts and ends every night of the week,
and there you have it, a show that does not need a person to actually
launch, it does it all by itself. Pretty cool eh?
A few years ago, we started leveraging
RGB
technology.
RGB
can be either dumb or intelligent. Meaning, dumb allows me
to control the color for an entire string of lights, or, intelligent allows
me to control one
individual light on that string along with all the other lights. Our RGB
Tree is an example of intelligent
RGB
technology.
That tree is driven with another software product called Madrix. Madrix is
essentially pattern generation, that we push out to a "matrix" of
RGB
pixels. That "matrix" wraps around the
RGB
Tree to the tune of 315 degrees. Think of it as a big TV screen. I go into
great detail below, but just know that Madrix actually plays "through" the
LOR Sequence Editor to give you the effects you see on the
RGB
Tree. There is great freeware available today, Xlights/Nutcracker,
that can do a lot of what Madrix does. It sounds harder than it really is,
but all you have to know, is that it looks sooooo cool when you see it.
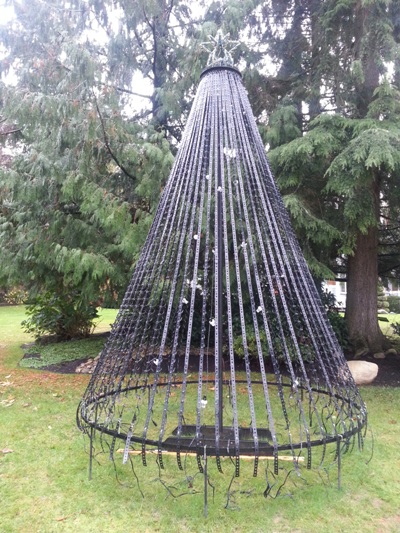
What is involved with the RGB
Tree? How can I make one? - This tree for Woodinville
Wonderland was originally implemented in 2012. The initial 2 years were very
frustrating and the
RGB
Tree those years suffered a lot. The pixel nodes were originally
bought directly out of China, and the first 2 years, the product had different
failures. So I was not going to let that vendor have a 3rd chance. He did
however provide full refunds for those 2 years, but hundreds of hours were
lost, and the Tree never worked like it was designed to. A note here, many
have used products direct from China with no issues per se. There are nodal
failures that need to be troubleshot, but that is another discussion. Lesson, is before you invest, ensure what you are getting is going to
be reliable, because it can come back to bite you and become a time sync.
Early January 2015, I started a quest to find the product to use in 2015. It
took months of research and dozens of conversations. Eventually 3 other
decorators along with myself made a decision to go with
Advatek Lights. More
detail below. There are many ways to do an RGB
Tree, but essentially there are 2 styles, a flat 2D or
a cone shaped 360degree more fashioned after what we call Mega Trees. I did
the latter, only mine is only 315degrees, so I can access the back for set
up and maintenance. No one notices that. Some companies are starting to
put together kits to make them, I cannot speak for those products
personally, and the few that come to mind are
Creative Displays,
Reinders and
DIY LED Express. I have used all
of them for other products, just not RGB.
There are 3 components to creating this tree as a Do
It Yourself (DIY) project. Here is a breakdown of the 3 components:
1. Frame - I did a cone shaped, there are How-To's on how to create the 2D
version on the web. I did not recreate the wheel here. I leveraged 2 items
from very dear friends of mine, who are ambassadors in our hobby. Walter and
Jackie Monkhouse of Magic Christmas.
They have a How-To section on their site. I leveraged Walters
Portable Hole,
and his
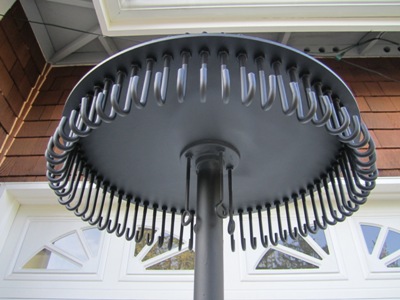
ColorMotion Tutorials. I use a solid 2" black pipe going up to my
hookhead. At some point, I will make a
JUMP pole
too, but I am set here for now. For my base ring, I leveraged 1" square
aluminum stock professionally bent and drilled to my specs from Matt Ross of
Rainy Oregon Christmas. Aluminum is light yet sturdy enough for this
purpose. Holes were drilled on equidistant centers to allow for "J" hooks to
be inserted into the base ring, to align and tension the light stringers. I created custom made stakes to go into
the ground approx 2' off the ground. The base ring is then bolted to those
stakes using "U" bolts. This holds it all into place for the small amount to
tension to be applied to the light stringers. The only thing I did different
that is not pictured, is that after the hookhead was fabricated, I had
someone plasma cut a wagon wheel effect to keep things rigid, yet lighten
the weight of the hookhead.
2. RGB
Pixels. I can spend hours here. Without getting too
detailed, you need a bit of background on RGB
technology.
AusChristmasLight
forum is the best place to start. They have a RGB
101 document that is
outstanding. I settled on
Advateks Pixlite Pro RGB
Pixel in the square configuration. We had Luke
Taylor, the owner, customize these strings for all of us who bought them. In over 13K pixels bought,
there was only 1 single failure that I was made aware of. That is
never the case with direct from China based products. This is his Advatek's
second generation pixel product that is controlled by the MY9231 My-Semi
chip. Only 2 companies use this protocol.
Stellascapes is the other. The
RGB
Pixels use 3/4"
wide strips leveraging the
MISR clips at the top, bottom and the join section where I had to extend
the strips to get my lights installed. My stingers have 50 pixels going up,
then another 50 pixels coming down for one string of 100 pixels. The strip
come pre-punched on 1" centers, and I spaced my pixels 3" apart. There are 2
basic RGB
Pixel products used on trees, the pixels I have
referenced and used, and what is also call RGB
Ribbon or "Strip". One is not better than the other, it
all depends on your tree, and the look you want. The last item to note in
this section is the pixel voltage. Typically there is either 12V pixels or
5V pixels. Each has it pros & cons. Some overall understanding of what you
want to eventually design, and the logistics of implementing your creation,
could play into the voltage part of the equation. The Advatek Pixels I chose
are 5V.
3. Control. This too has 3 subsections. First, you need an RGB
controller that speaks E1.31 (DMX over ethernet).
Second a network switch, and Cat5/6 cabling, and then lastly, software to drive the
effects. There are numerous controller options out there. You can go DIY or
Plug and Play. The major DIY controllers are from
Falcon Christmas,
J1Sys,
and SanDevices. Advatek,
also has DIY versions of their controllers. Then you get into plug and play.
Advatek, Stellascapes,
Light-O-Rama,
are the companies that come to mind that have
plug and play options. This is sort of like cars. What do you like, Fords or
Chevys. Each has its merits. Doing a bit of leg work and research will help. Then we get to the software.
LOR has a pixel editor in their S4 release.
Xlights has fabulous free software to
drive the tree and matrices'. There are a few others, HLS is freeware with a
limited following (from what I can determine), Light Show Pro that is now
owned by Minleon, and just had a major product update last year. I use a
commercial product called Madrix. Again, here some legwork is going to be
needed, and a budget determined.
I settled on going with Advatek for both pixels and controllers. The pixel
decision, forced the controller decision due to the protocol of the pixels.
No other controller besides Stellascape will drive the MY9231. The main
message I can relate, is that anything RGB
Pixel related is going to require some research,
comfort with networking, and a bit of electronics as you need to understand
soldering & troubleshooting. Along with that you may require power
injection, again a term you will learn once you understand voltage drop,
etc.... This may make it sound harder than it is, it is just that a
lot goes into one of these features, but Oh My will it be beautiful once you
get it up and running.
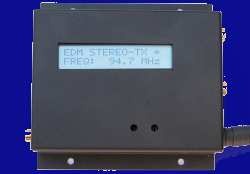
How do the songs play on the radio? - This is quite easy. I have a low power (10mw) FM transmitter. See the picture below. This is a very small unit, about 4 1/2"x3 1/2" x 1"that can actually broadcast RDS as well. RDS is the radio text you see streaming on the newer radios. I do not have the RDS working yet, I am torn. I want visitors to watch the display, not the song title on the radio screen! The computer (laptop) that runs the show has a cable I plug into the audio jack (headphones). Then plugs into the FM transmitter, that goes out to a dipole antenna I have on my roof, and "Viola" a FM radio station. The FCC allow homeowners to broadcast into the space immediately around their house. Anything beyond a few hundred feet is considered illegal. I have to find blank air space on the FM frequency spectrum to broadcast into so that you can hear it clearly. My choice for 101.9 was selected for many reasons, and should be good to use for many years to come.
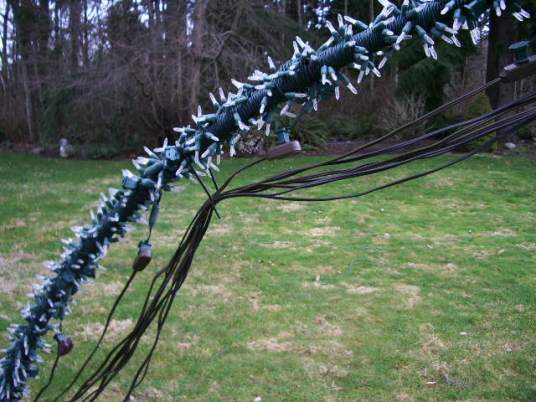
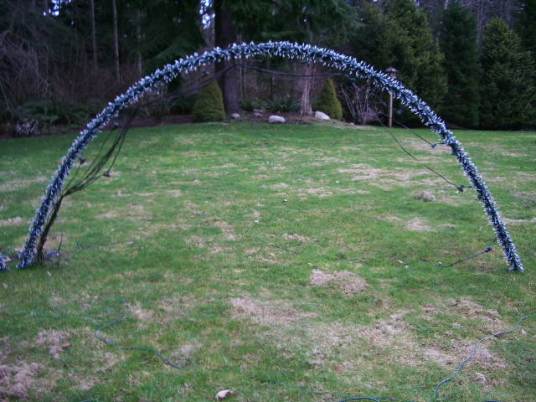
How do the Leaping Light Arches (LLA's)work? - These are made up of 2 10' sections of 1" electrical PVC conduit. I mate the 2 10' pieces together, space the ends 14' apart, drive 3' concrete form stakes into the ground at an angle, (some use rebar) then slide the PVC ends onto the stakes, which gives them the arch height of about 6'. Each 10' piece, has 7 sections of lights. Each section wrapped with 100 Pure White LED minis. This give me a whopping 1400 lights per completed arch. As you can see from the picture, I run a wire harness under the arch that plugs into each section. At night you never see this harness. The magic happens in sequencing that make them flow like they do. It is just a sequentially staggered lighting of each section on the arch The picture below is one of the more complex patterns I have for the LLA's inside the Sequence Editor. You are also only seeing 3 of the 6 total LLA's in the yard.
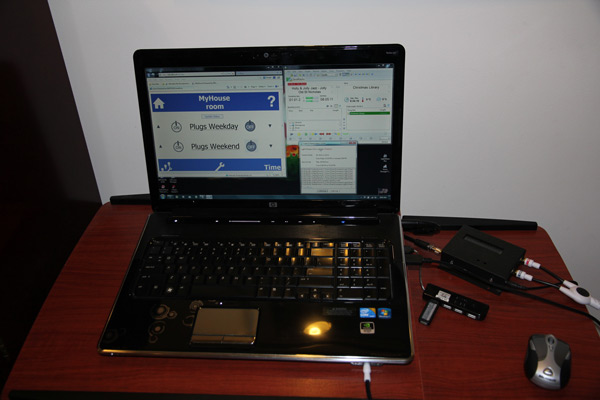
Below is a picture of the "Show Laptop" Lot's ask how the show works. This laptop is responsible for interfacing with the plugs on the outside of the house that turn all the static display, and DMX lights on. Static items are those that do not blink or flash in the show, and the DMX lights are the floods and large zap strobes. They need to have power before they can be used. A good example is all the items right at the street entrance. The LED sign, Tune to Sign etc... That interface can be seen in the left side. I have a schedule for turning plugs on at the same time each day, and off at different times depending if it is a weekday or weeknight. Another cable not show below, comes out of the RJ45 jack and runs to a Ethernet Switch to control the E1.31 items. This laptop also plays my Christmas Music Library on my "radio station" 24x7 during the season, except with the show is running. That interface is in the upper right part of the screen. Lastly, I can directly monitor the show inside while it is playing. That is the smaller box in the lower right part of the screen. Lastly, you see just to the right of the laptop and square black box with 2 white RCA plugs coming out of it. That is my FM transmitter. You can see another white plug in front of the laptop, that is the headphone jack, which sends the audio out, into the FM Transmitter. From this laptop, literally 99% of my display is managed remotely. I only have to get my Santa in the Window, and the LED trees in the North Pole turned on (with a remote) Also, this year is another boom box in the yard to assist with the outside sound, that has to be turned on manually as well and that's it!
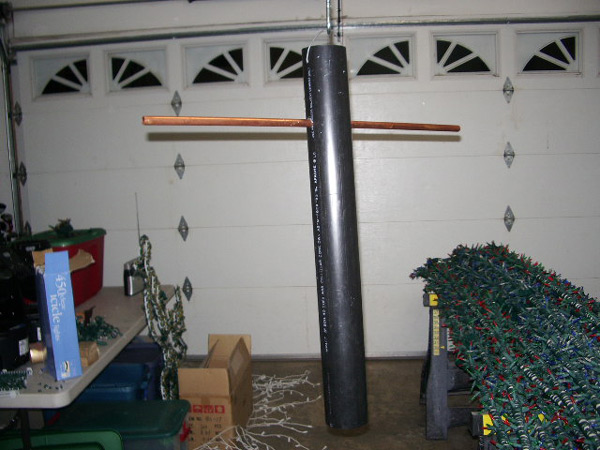
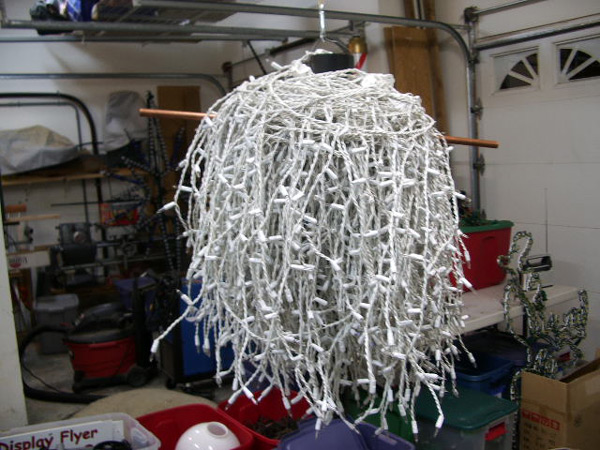
How we store our Icicle Lights? A lot of visitors ask how the icicles on the house stay so straight. Trying to explain it is difficult and a few pictures below show you what I devised. The carrier is just 4" PVC pipe with a 1/2" copper pipe through it. Once the icicles are strung on the carrier, it is then hung in the attic above the garage. The summer heat helps to keep things straight. I peel them off 6 strings at a time, test them, then carry them to the roof. These are commercial strings so I can connect 6 inline before I have to break them up. These are still incandescent bulbs and have to be handled as such. This is one of the display items where, to date, no reasonable LED product has been produced to make me want to switch. There are 25 total strings of icicles on the roof. 17 strings on the lowest tier, 6 on the middle tier and 2 on the upper most gable. These constitute my largest amperage draw at over 11.25 amps when they are all on.

Copyright 2006 - 2023 Woodinville Wonderland